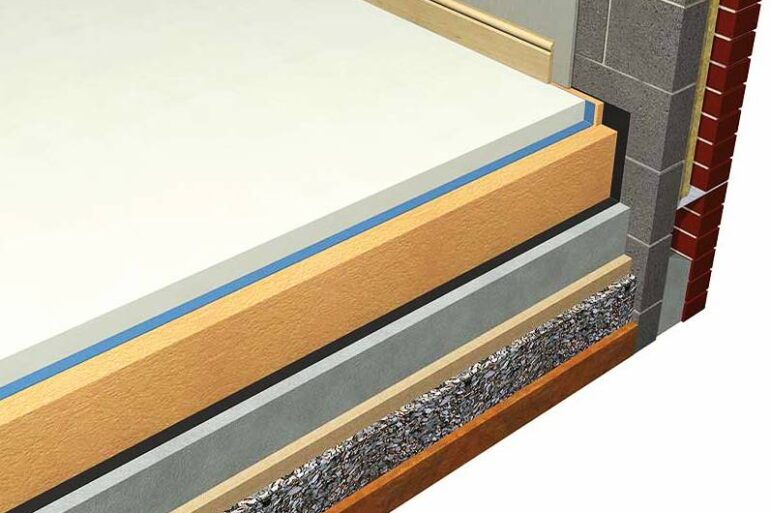
When it comes to constructing a durable and energy-efficient space, a concrete floor with insulation is a popular choice. Building an energy-efficient, well-insulated, durable, and well-insulated structure requires concrete floors with insulation. Whether you are constructing a new home or renovating an existing space, understanding the process and techniques involved in this type of flooring is essential.
A concrete floor with insulation is not only durable, but also thermally efficient, soundproof, and moisture resistant. Great, insulation of concrete floor offers many advantages but how to apply this method?
In this article, we present you a step-by-step guide on how to lay a concrete floor with insulation. In the next paragraphs, you will explore the process of laying a concrete floor with insulation to create a cozier environment at your property.
But first Let’s Understand What is Insulation
Insulation refers to materials used to slow down the transfer of heat, sound, or electricity. When it comes to concrete floors insulation includes installing materials below the concrete slab that help for regulation of the temperature and reduce energy consumption. Usually, the most common insulation materials are foam boards, fiberglass, and mineral wool.
How to Lay a Concrete Floor with Insulation – step-by-step guide
Laying a concrete floor with insulation is a complex process that requires careful planning and attention to detail. The experts of ReSand.co.uk offer a comprehensive guide that will lead you to a step-by-step process of laying a concrete floor with insulation.
Step 1: Preparation
Every floor project starts with preparation. Clear the area where the concrete floor will be laid and make sure to remove any debris, rocks, or obstructions. Before you start you have to also ensure that the floor is leveled. If there are any imperfections you have to spend time to repair them. The last thing you have to do as a part of the preparation step is measure and mark the perimeter of the floor.
Step 2: Choose the insulation material
To select an appropriate insulation material, you have to consider factors such as thermal efficiency, moisture resistance, ease of installation, and cost. Some common options for insulation materials are:
- Foam boards;
- Fiberglass batts;
- Mineral wool;
- Polyurethane spray foam;
- Reflective foil insulation.
Step 3: Install a vapor barrier
This step is optional and depends on the location and moisture conditions of the area. If the area is exposed to harsher conditions or subject to more moisture is better to install a vapor barrier over the subfloor before laying the insulation. The vapor barrier helps prevent moisture from reaching the insulation and causing damage.
Step 4: Cut and fit insulation
Insulation material should be cut to fit the dimensions of the floor area. Measure the area which you will insulate and then cut the insulation material according to the dimensions. Don’t forget to leave a small gap around the edges to allow for expansion. Then lay the insulation boards tightly together, ensuring there are no gaps or overlaps between pieces.
Step 5: Secure insulation in place
Install the insulation to the subfloor by using an adhesive or mechanical fastener (like nails or screws).
Step 6: Mix concrete
Follow the manufacturer’s instructions to prepare the concrete mix. Make sure you follow the correct ratio of cement, aggregate, and water. Then use a concrete mixer or mixing tray to blend the ingredients until you achieve a uniform consistency.
Step 7: Pour concrete
Starting from one corner pour the concrete mixture onto the insulated floor area. Use a concrete pump to distribute the concrete evenly, filling any gaps or voids as you go.
Step 8: Spread and level concrete
Spread the concrete evenly across the floor surface by using a screed board or bull float. The use a straightedge to ensure the concrete is level.
Step 9: Finish concrete surface
After the concrete is spread and leveled, use a trowel to smooth the surface and remove any excess material. Then let it cure. Usually, it takes 24 to 48 hours. Follow the recommendations of the manufacturer and keep the concrete moist during this time to prevent cracking.
Benefits of Concrete Floor with Insulation
Whether you’re building a new home or renovating an existing space, this combination offers numerous benefits. The first of them is improving of thermal efficiency of the space. Insulation helps maintain consistent indoor temperatures by reducing heat loss. This also helps reduce electricity bills.
Another benefit includes reducing the noise. Floor insulation enhances privacy and comfort by dampening the transmission of sound between floors or rooms in a building. Concrete floor with insulation provides also moisture resistance because certain insulation materials can act as a barrier against moisture.
Last, but not least Insulated floors provide a more comfortable living or working environment by eliminating cold spots and drafts. This also increases the value of the property which can bring more potential buyers.

Lily Edwards is a dedicated blog author for ReSand.co.uk, using her background in Interior Design to write insightful articles on floor care, including sanding, oiling, and polishing.
When she's not crafting informative blog posts, Lily enjoys exploring the British countryside, antique hunting, and indulging her love for DIY home improvement projects.
